RTA Cabinet Assembly Instructions PDF: A Comprehensive Guide
RTA cabinet assembly PDFs are revolutionizing the customer experience, offering interactive 3D guides via apps like BILT for easier installation and troubleshooting.
Understanding RTA Cabinets
RTA, or Ready-To-Assemble, cabinets represent a popular and cost-effective solution for kitchen and bathroom renovations. These cabinets arrive flat-packed, requiring assembly by the homeowner or a professional installer. Understanding the components and the assembly process is crucial for a successful project.
The appeal of RTA cabinets lies in their affordability and convenience. They bypass the costs associated with pre-assembled cabinets, such as labor and transportation. However, successful installation hinges on accessing clear, comprehensive assembly instructions, often available as PDF downloads. Resources like the RTA Cabinet Store provide these guides, and innovative platforms like BILT offer interactive 3D assistance, simplifying the often-daunting task of cabinet construction.
What Does “RTA” Mean?
RTA stands for “Ready-To-Assemble.” This designation signifies that the cabinets are shipped flat-packed, disassembled, and require the end-user to complete the construction process. Unlike pre-assembled cabinets, RTA options offer significant cost savings, as they eliminate the manufacturer’s assembly labor.
Essentially, you’re purchasing the raw materials and components – the cabinet boxes, doors, drawers, and hardware – and taking on the responsibility of putting them together. Detailed assembly instructions, frequently provided as PDF documents, are vital for navigating this process. Modern solutions, like the BILT app, are transforming RTA assembly with interactive 3D guides, making it more accessible and less intimidating for DIY enthusiasts.
Benefits of RTA Cabinets
RTA cabinets present numerous advantages, primarily centered around affordability and customization. Their flat-pack nature drastically reduces shipping costs compared to pre-assembled units. This cost-effectiveness makes kitchen renovations and updates more accessible. Furthermore, RTA cabinets offer flexibility in design, allowing homeowners to select specific styles, finishes, and configurations.
While assembly is required, readily available PDF assembly instructions and innovative tools like the BILT app simplify the process. These resources provide clear guidance, minimizing frustration and ensuring a successful installation. Choosing RTA doesn’t compromise quality; many manufacturers utilize durable materials and construction techniques.
Where to Find RTA Cabinet Assembly PDFs
Locating RTA cabinet assembly PDFs is typically straightforward. Most retailers, like RTA Kitchen & Bathroom Cabinet Store, offer downloadable instructions directly on their websites. Look for a “Files & Articles” or “Resources” section, often containing a dedicated “Assembly PDFs” dropdown menu. Specific cabinet models, such as base or wall cabinets, will have corresponding guides.
Additionally, manufacturers often provide PDFs on their official websites. Searching online using the cabinet model number and “assembly instructions PDF” will yield results. The BILT app is another valuable resource, offering interactive 3D guides, often linked from retailer websites. Always ensure the PDF matches your specific cabinet model for accurate guidance.

Preparing for Assembly
Before starting, inventory all cabinet parts and gather necessary tools. Adequate workspace preparation is crucial for a smooth and efficient RTA cabinet build.
Tools Required for Assembly
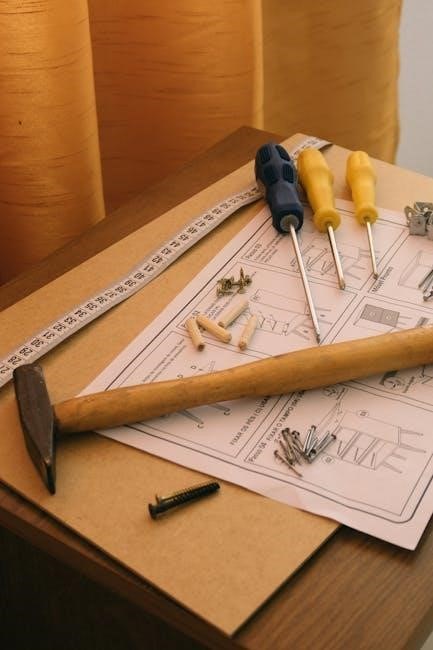
Successful RTA cabinet assembly necessitates a specific toolkit. A Phillips head screwdriver – both manual and powered – is essential for most connections. A flathead screwdriver may also be needed for certain adjustments.
A rubber mallet proves invaluable for gently tapping pieces into place without causing damage. A level is critical for ensuring cabinets are straight and plumb, especially during wall mounting.
Measuring tape aids in accurate placement and verification of dimensions. A drill with appropriate bits is often required for installing hardware and securing cabinets to walls. Don’t forget safety glasses to protect your eyes from debris!
Consider a stud finder for secure wall mounting, and potentially wood glue for added stability in joints.
Inventory of Cabinet Parts
Before commencing RTA cabinet assembly, a thorough inventory is paramount. Carefully unpack all components and cross-reference them with the parts list included in your assembly PDF or documentation. Expect to find side panels, top and bottom panels, back panels, shelves, doors, and drawer fronts.
Hardware will include screws, dowels, cam locks, and potentially drawer slides. Verify the quantity of each item matches the list. Missing parts can halt progress, so address discrepancies immediately with your supplier.
Pay close attention to identifying different screw types and sizes. Organize parts logically to streamline the assembly process. A detailed inventory prevents frustration and ensures a smooth build.
Workspace Preparation
Adequate workspace is crucial for successful RTA cabinet assembly. Choose a spacious, well-lit area, free from obstructions. Protect your flooring with a drop cloth or cardboard to prevent scratches during assembly. Ensure sufficient room to maneuver around the cabinets as you build them.
Clear the area of any tools or materials not directly related to the current assembly step. Having a clean, organized space minimizes errors and improves efficiency. Consider the cabinet’s final location and assemble as close as feasible to reduce carrying.
Good ventilation is also important, especially if using adhesives or finishes. Prepare for a focused, uninterrupted build.

Base Cabinet Assembly
Base cabinet assembly begins with the frame, followed by the back panel installation, and finally, the attachment of doors and drawers for completion.
Assembling the Base Frame
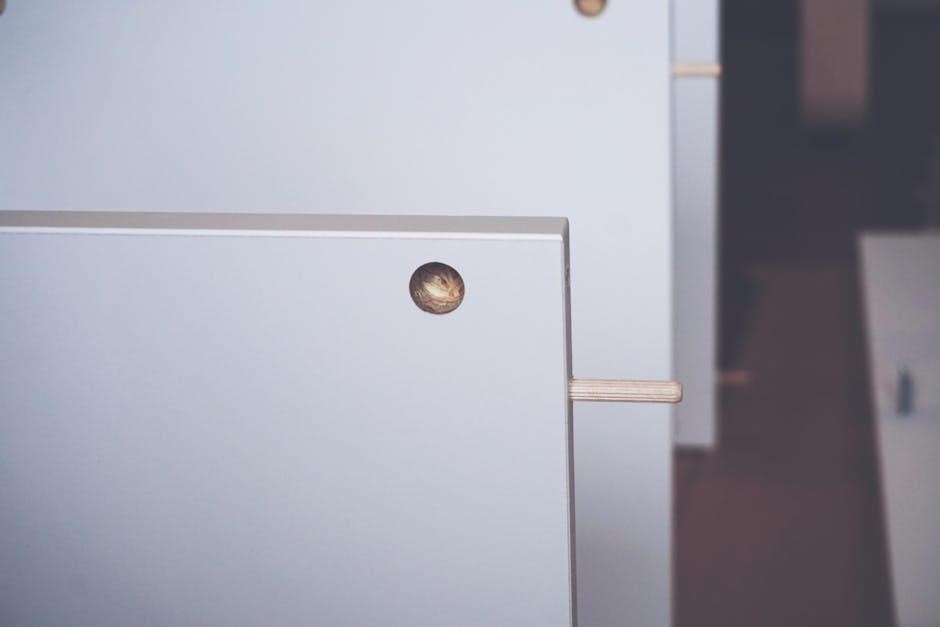
Assembling the base frame is the foundational step in RTA cabinet construction. Begin by identifying all frame components – side panels, bottom panel, and front rail. Carefully connect these pieces using the provided hardware, typically cam locks and dowels, ensuring a snug and square fit.
Refer to the PDF assembly instructions for specific hardware placement and tightening sequences. Double-check alignment before fully securing the connections. A properly assembled base frame provides stability for the entire cabinet. Pay close attention to the orientation of each piece, as incorrect placement can lead to issues later in the assembly process.
Ensure all corners are square using a carpenter’s square before proceeding. This initial step is crucial for ensuring the cabinet’s overall structural integrity and functionality.
Installing the Back Panel
Installing the back panel significantly enhances the structural rigidity of the base cabinet. Typically, the back panel is a thin sheet of hardboard or plywood. Align the panel carefully with the assembled base frame, ensuring it’s flush with all edges.
Secure the back panel using the provided nails or screws, spaced evenly around the perimeter. The PDF assembly instructions will detail the recommended fastening pattern. Proper installation prevents racking and ensures the cabinet remains square.
A correctly installed back panel also provides a mounting surface for attaching the cabinet to the wall. Verify the panel is securely fastened and lies flat against the frame before moving on to the next assembly stage. This step is often overlooked, but vital for long-term cabinet stability.
Attaching the Doors and Drawers
Attaching doors and drawers completes the functional aspect of base cabinets. Begin by installing the hinges onto the cabinet frame, referencing the PDF assembly instructions for correct placement and screw types. Then, carefully align and attach the doors to the hinges, adjusting for proper alignment.
Drawer slides are typically installed next, ensuring they are level and securely fastened to both the cabinet frame and the drawer boxes. Slide the drawers into the cabinet, testing for smooth operation. Adjustments are often necessary to achieve perfect alignment and effortless gliding.
Pay close attention to the instructions regarding handle or knob installation, ensuring they are securely attached and aesthetically pleasing. Proper door and drawer installation is crucial for both functionality and the overall appearance of your kitchen.

Wall Cabinet Assembly
Wall cabinet assembly involves constructing the frame and securely mounting it to the wall, followed by door and shelf installation for storage.
Constructing the Wall Cabinet Frame
Assembling the wall cabinet frame typically begins with connecting the side panels to the top and bottom pieces, utilizing cam locks and dowels for a secure fit. Carefully follow the PDF instructions, ensuring proper alignment before tightening.
The back panel is often added at this stage, providing rigidity to the structure. Some models may require nailing or screwing the back panel in place. Pay close attention to the orientation of the panels, as incorrect placement can lead to issues during installation.
Double-check all connections for tightness and stability before proceeding. A well-constructed frame is crucial for the overall integrity and longevity of the wall cabinet. Interactive guides, like those offered by BILT, can visually demonstrate each step, simplifying the process.
Mounting the Cabinet to the Wall
Securely mounting wall cabinets requires locating wall studs for optimal support; a stud finder is essential. Always refer to the RTA cabinet’s PDF instructions for specific mounting height recommendations and hardware requirements.
Typically, a ledger board is attached to the wall studs, providing a level base for the cabinet. The cabinet is then positioned onto the ledger board and secured with screws. Ensure the cabinet is perfectly level before fully tightening the screws.
Additional screws are driven directly into the wall studs through the cabinet’s back panel for added stability. Interactive 3D guides, like BILT, can visually clarify this process, ensuring a safe and reliable installation.
Door and Shelf Installation
Door installation begins with attaching hinges to both the cabinet frame and the doors themselves, referencing the RTA cabinet’s PDF for correct placement. Precise alignment is crucial for smooth operation; adjustable hinges allow for fine-tuning.
Shelf supports, often small metal or plastic pins, are inserted into pre-drilled holes inside the cabinet. Shelves are then placed onto these supports. Adjustable shelf supports offer flexibility in shelf height.
Interactive assembly guides, such as those powered by BILT, provide step-by-step visual assistance, simplifying hinge adjustments and shelf placement. Addressing misaligned doors is often covered in troubleshooting sections of the PDF.
Specialty Cabinet Assembly
RTA cabinet PDF guides detail unique builds like lazy susans, blind corners, and microwave shelves, requiring specific hardware and careful step-by-step following.
Lazy Susan Corner Base Cabinet Assembly
Assembling a lazy susan corner base cabinet from RTA components demands precision. PDF instructions typically begin with frame construction, ensuring squareness before proceeding. Next, the rotating mechanism – the “lazy susan” itself – is installed within the cabinet’s base.
Careful attention must be paid to bearing placement for smooth rotation. Shelves are then attached to the rotating platform, often requiring specific hardware; PDF guides illustrate proper shelf alignment and securing methods. Finally, the face frame and door are installed, completing the assembly.
These instructions emphasize checking for free rotation at each stage, preventing binding. Proper installation ensures maximized corner cabinet accessibility and efficient storage within your kitchen.
Blind Corner Base Cabinet Assembly
RTA blind corner base cabinet assembly, detailed in PDF guides, presents unique challenges due to limited accessibility. Initial steps involve constructing the cabinet frame, prioritizing a secure and square build. Specialized hardware, including pull-out mechanisms or pivoting shelves, is then installed.
These mechanisms are crucial for maximizing storage in this awkward space. PDF instructions meticulously illustrate the mounting of these components, emphasizing correct alignment for smooth operation. Door installation requires precise adjustments to avoid obstruction and ensure full access.
Careful attention to the pull-out system’s track alignment is vital. These guides often include troubleshooting tips for common issues like binding or misalignment, ensuring optimal functionality.
Assembling Microwave Shelves
RTA microwave shelf assembly, as detailed in PDF instructions, typically begins with constructing the shelf frame, ensuring squareness and stability. These shelves often utilize adjustable supports, requiring precise placement according to the PDF diagrams. Installation involves securely attaching the shelf to existing wall cabinets or dedicated microwave alcoves.
PDF guides emphasize the importance of using appropriate screws and anchors, considering wall material for secure mounting. Ventilation considerations are also highlighted, ensuring adequate airflow around the microwave.
Detailed illustrations demonstrate proper shelf alignment and weight distribution. Troubleshooting sections address common issues like wobbling or insufficient support, offering solutions for a safe and functional installation.

Using Digital Assembly Instructions (BILT)
BILT provides interactive 3D assembly guides, revolutionizing RTA cabinet installation with a user-friendly app and eliminating traditional PDF confusion.
Downloading and Using the BILT App
BILT is a groundbreaking application designed to simplify the often-complex process of RTA cabinet assembly. Downloading the app is straightforward – it’s readily available on both the Apple App Store and Google Play Store for free. Once installed, users can access interactive, step-by-step 3D instructions specifically tailored to your cabinet model.
Instead of struggling with traditional PDF manuals, BILT guides you visually through each stage of assembly. The app eliminates ambiguity by allowing you to rotate the view, zoom in on details, and even rewind or fast-forward as needed. Simply search for your specific cabinet brand and model within the app to unlock the corresponding instructions. This innovative approach significantly reduces assembly time and minimizes errors, making the entire experience more enjoyable and efficient.
Interactive 3D Assembly Guides
BILT’s core strength lies in its interactive 3D assembly guides, a significant leap forward from static PDF instructions. These guides present a dynamic, visually-rich experience, allowing users to explore each assembly step from any angle. You can rotate the cabinet model 360 degrees, zoom in on connection points, and clearly visualize how parts fit together.
This immersive approach drastically reduces confusion and the potential for errors. Unlike traditional manuals, BILT doesn’t rely solely on diagrams; it provides a realistic, animated demonstration of the assembly process. Each step is broken down into manageable segments, making even complex cabinet builds accessible to DIY enthusiasts. The interactive nature empowers users to learn as they build, fostering confidence and a successful outcome.
Troubleshooting with BILT
BILT isn’t just for initial assembly; it’s a powerful troubleshooting tool. Encountering issues like misaligned doors or drawer malfunctions? The app provides targeted solutions within the 3D guides. Users can revisit specific steps, identify potential errors, and see how to correct them visually.
Instead of sifting through lengthy PDF manuals, BILT offers immediate, context-specific assistance. The interactive format allows you to pinpoint the exact problem area and receive clear, concise instructions for resolution. This feature minimizes frustration and reduces the need for contacting customer support. BILT empowers users to independently address common assembly challenges, ensuring a smooth and satisfying cabinet installation experience.

Troubleshooting Common Assembly Issues
RTA assembly can present challenges like missing parts, misaligned doors, or drawer problems; detailed PDF guides and apps like BILT offer solutions.
Dealing with Missing Parts
Discovering missing parts during RTA cabinet assembly is a common frustration, but thankfully, solutions exist. First, meticulously re-check the inventory list included with your cabinets, comparing it against the components you’ve unpacked. Often, smaller items are tucked away within packaging.
If a part is genuinely missing, immediately contact the retailer or manufacturer – RTA Cabinet Store, for example – providing your order number and the specific part description. Most suppliers are quick to ship replacements, minimizing project delays.
Keep your assembly PDF handy when contacting support; referencing diagrams can clarify exactly which component is needed. Don’t attempt to substitute parts, as this could compromise the cabinet’s structural integrity. Patience and clear communication are key to resolving this issue efficiently.
Addressing Misaligned Doors
Misaligned doors are a frequent challenge during RTA cabinet assembly, but are often easily corrected. Begin by checking the hinge screws – ensure they are snug, but not overtightened. Small adjustments to these screws can significantly impact door alignment.
Consult your assembly PDF for specific hinge adjustment instructions, as mechanisms vary between manufacturers. Many hinges feature adjustment dials for fine-tuning vertical, horizontal, and depth alignment.
If adjustments don’t suffice, inspect the cabinet frame itself for squareness. A slightly warped frame can cause alignment issues. If the frame is the problem, shims may be necessary. Remember to work methodically and make small adjustments, checking frequently to avoid overcorrection.
Fixing Drawer Issues
Drawer problems during RTA cabinet assembly often stem from incorrect slide installation or misalignment. First, verify the drawer slides are securely attached to both the drawer box and the cabinet interior, referencing your assembly PDF.
Ensure slides are parallel and at the same height on both sides. If a drawer binds or doesn’t close fully, loosen the slide screws and gently adjust the drawer’s position. Many slides have adjustment screws for fine-tuning.
Check for obstructions within the cabinet or drawer box. Sometimes, a misplaced component can hinder smooth operation. Finally, confirm the drawer front is properly aligned and secured to the drawer box.

Safety Precautions During Assembly
RTA cabinet assembly requires wearing protective gear and utilizing proper lifting techniques to avoid injury and prevent damage to the cabinet components.
Wearing Protective Gear
Prioritizing safety during RTA cabinet assembly is crucial, and wearing appropriate protective gear is a fundamental step. Dust masks are highly recommended to prevent inhalation of wood particles generated during cutting or sanding, safeguarding your respiratory system.
Safety glasses or goggles are essential to shield your eyes from flying debris, ensuring clear vision throughout the process. Work gloves provide a secure grip and protect your hands from splinters and sharp edges.
Closed-toe shoes are non-negotiable, offering foot protection against dropped tools or cabinet pieces. Consider ear protection if using power tools for extended periods, minimizing noise-induced hearing damage. Remember, a proactive approach to safety ensures a smooth and injury-free assembly experience.
Proper Lifting Techniques
RTA cabinet components can be surprisingly heavy, making proper lifting techniques essential to prevent back injuries. Always assess the weight of the item before attempting to lift it, and if it feels too heavy, seek assistance. Bend at your knees, not your waist, keeping your back straight and core engaged.
Maintain a firm grip and keep the load close to your body throughout the lift. Avoid twisting while lifting or carrying, as this puts undue stress on your spine.
Take small, deliberate steps, and avoid rushing. When placing the cabinet component down, reverse the lifting process, bending at the knees and keeping your back straight. Prioritizing safe lifting practices will protect your physical well-being during assembly.
Avoiding Damage to Cabinets
Protecting your RTA cabinets from damage during assembly is crucial for a beautiful, lasting kitchen. Work on a protected surface, like a drop cloth or cardboard, to prevent scratches and dents. Avoid using excessive force when tightening screws, as this can strip the holes or crack the cabinet material.
Be mindful of sharp tools and avoid dragging cabinet pieces across the floor. Carefully inspect all parts for existing damage before beginning assembly, and report any issues to the retailer.
Following the assembly instructions diligently and handling components with care will ensure your new cabinets remain pristine.